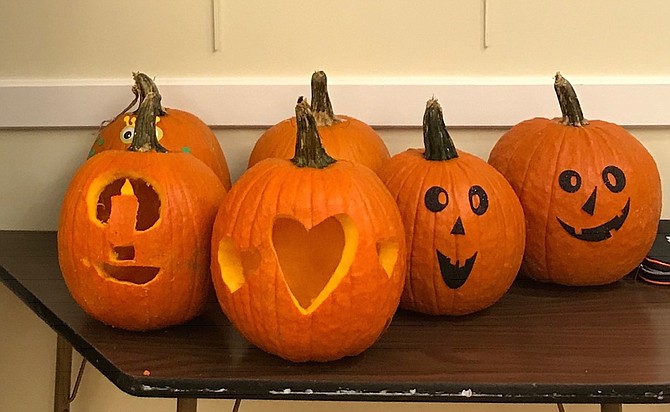
Front porch-ready Halloween pumpkins. Photo courtesy of Lisa Searby

“You don’t have to break the bank, but you need to get a set of tools that are sturdy enough to stand up the the heft of a thick-skinned pumpkin.” —Lisa Searby, pumpkin artist
“Ick, this is so gross,” said one 11-year-old girl with shoulder length blonde hair. “Those are the guts,” said her classmate, a 12-year-old, white apron-clad boy, as he pulled a handful of stringy, orange pulp out of a fat pumpkin.
“It’s part of the process. You have to clean out the messy insides before you can start carving a beautiful design,” said Lisa Searby, who was offering an in-home lesson in carving Halloween pumpkins to a group of middle school students and their parents.
A drive around most neighborhoods during this, the spookiest season of the year, will likely reveal the efforts of many to carve a sophisticated pumpkin. From frightening to fanciful, the art of pumpkin carving is a skill that eludes many. So on a chilly Sunday afternoon, Searby, who lives in Bethesda, Md. trekked to the Fairfax home of Katie and Luke Gunther to offer a class in pumpkin carving. With a few tricks and the right tools, Searby says that almost anyone can create a front porch-worthy gourd.
After the parent-child duos have donned aprons and the pumpkins are placed atop tables covered with plastic and topped with newspaper, the instruction begins. A set of carving tools is something that Searby recommends to anyone who wants to create an impressive design.
“You don’t have to break the bank, but you need to get a set of tools that are sturdy enough to stand up the the heft of a thick-skinned pumpkin,” she said. “You can usually find them online pretty easily. Choose a set that has a tool for each step of the process, like a little serrated saw to cut a hole in the top and a scooper to clean out the flesh. It makes carving so much easier.”
It appears that parents agree. “I didn't realize that there was such a thing, but these little tools are awesome,” said Luke Gunther, the father of 12-year-old twins. “We usually use a kitchen knife and it’s hard to cut through and the edges of the designs are always jagged, but the tools make a much smoother cut.”
Once the tops of the pumpkins are removed and the pulp, flesh and seeds area cleared, the artistry begins. “Use a dry-erase marker to to sketch the design that you want to carve on the front of your pumpkin,” said Searby. “Does anyone know why we’re using a dry-erase marker instead of a Sharpie? Because if you make a mistake or don’t like your drawing, you can wipe off a dry-erase marker and start over. Sharpies are permanent.”
Three hearts are what Theresa Holt and her 12-year-old son and 11-year-old daughter choose for the front of their pumpkin. “This is such a fun thing to do, even if you don’t care about the outcome, it’s a great way to spend time together as a family,” she said.
Those who choose to use one of Searby’s pre-designed templates are instructed to attach the template to the pumpkin and use the spike tool to trace the design onto the gourd, leaving tiny pinholes in its thick flesh. Next, the class uses one of the carving tools to cut out the facial features or other designs and, voila, in less than 30 minutes the group produces six pumpkins that are ready for Halloween.
“If you’re going to use candles to illuminate your pumpkins at night, make sure you put the candles in a glass candle holder first,” said Searby. “Now the clean-up begins. It’s a messy process after all.”